
Raspberry Pi Timelapse Camera Rig
 A couple of weeks ago I was asked to set up a time-lapse camera rig to take a medium term timelapse video - 4-6 weeks worth of footage. The trick was that I only had a couple days notice and no budget (it's for a charity event). Since I had to work with what was available on hand here my immediate thought was a Raspberry Pi with a Raspberry Pi Camera Module.
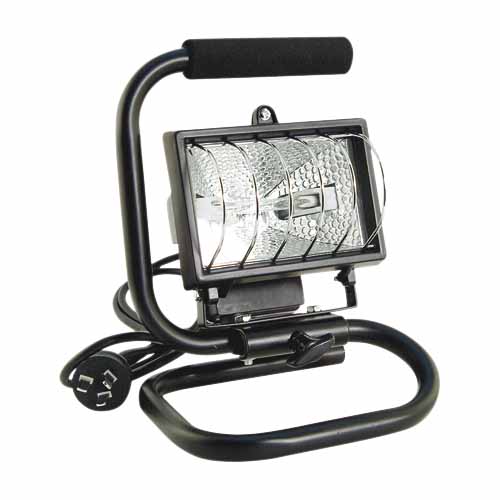
To use as an easily mountable weatherproof enclosure with a glass front for the camera I picked up a cheap halogen work light from a local hardware store. Quite cost effective at $14. After removing the handle and all of the interior parts, there's enough room for a Raspberry Pi, camera board and USB power supply.
As the time-lapse set up was going to be mounted into a caravan it needed to run on 12V, an easy way to do so was to use a Cigarette Lighter USB power supply, that way everything was "plug and play" with a standard Micro USB Cable.
A 12V lead acid battery (standard car battery in this case, donated by another sponsor) was procured to power the rig. To decrease the power usage I switched to a Raspberry Pi Model A, which due to the fact that it has no Ethernet controller, uses less power. Measured with the bench power supply here about 50mA less. The Model B Raspberry Pi with camera etc. used around 120mA, the Model A version only used around 70mA, a significant difference when running on battery power.
Not shown installed in the picture (it was taken half way through set up) is one of our High Precision Real Time Clock (RTC) Modules for Raspberry Pi - since this rig isn't connected to the Internet it requires an external clock to keep accurate time for the image filenames. This will make things much easier to deal with when it comes to creating the video.
The original plan was to install a tiny 32GB USB drive for the images, unfortunately it didn't quite fit, very close but not quite. It would have been fine if we had one of the Low-profile microSD card adapters in stock but unfortunately we had run out. I ended up just using a 32GB microSD card for the operating system and the storage. It will fill up at some stage if it's not tended to. There's enough space for around 3-4 weeks worth of images taken once per minute.
The software side of things was very simple. Install Raspbian, enable the camera module, set up the RTC, add a cron job to save the images from the camera and that's it;
#!/bin/bash

directory=/media/usb0
filename=image-$(date +"%Y-%m-%dT%H%M%S").jpg

raspistill -o $directory/$filename -w 1920 -h 1080
And below you see the final result, the USB power supply is mounted behind the Raspberry Pi board, the camera was stuck to the glass with some tape and the Pi itself held in place with a small piece of foam wedged against the glass.

1 response to "Raspberry Pi Timelapse Camera Rig"
-
The halogen light enclosure is an awesome idea. With those low power LED lights that campers use (with an old floppy disk to filter out the visible light), the RTC, NoIR Camera Module, and a lithium cell, this would make an excellent project for timelapsed night shoots like the old wildlife documentaries